Open your favorite photo from this week, then before you touch anything, say out loud what is actually wrong with it. Too dark. Too orange. Too much sofa. That one sentence tells you which sliders to move, and most baby photo editing stops there.
Five adjustments do roughly ninety percent of the work. The rest of the panel exists for edge cases, and for babies it mostly makes things worse.
Which five edits do most of the work?
1. Exposure
Phone cameras meter for the whole frame, so a baby on a cream blanket beside a bright window usually comes out too dark. Nudge exposure up until the skin looks like skin, then check the brightest part of the blanket. If it has turned into flat featureless white, you have gone too far. Back off until texture returns.
2. White balance
This is the adjustment that most often separates an amateur baby photo from a good one. Mixed light sources leave a color cast. Warm bulbs push everything orange while shade pushes everything blue, and a green wall three feet away can tint a whole face without anyone noticing until the photo is up on a big screen. Move the temperature slider until whites in the frame look white, not cream and not gray, then check the tint slider for green or magenta.
Find something in the shot you know is neutral. A white muslin works, so does a gray swaddle or the edge of a plain sheet. Balance to that object, not to the skin, because you do not yet know what the skin is supposed to look like.
How do you crop and add contrast without overdoing it?
3. Crop and straighten
Free, and it changes more than people expect. Straighten first, because a tilted horizon or a sloping door frame reads as sloppy even when nobody can say why. Then crop the clutter out of the edges. Most baby photos improve by cropping tighter than feels comfortable, right in to the head and hands, plus whatever they are curled against.
4. Gentle contrast
Soft window light produces soft, slightly flat files. A small contrast bump gives the photo some structure. Emphasis on small. Heavy contrast digs shadows into the eye sockets and blows out the highlight on the forehead and nose, which is unflattering on a face with almost no bone definition.
Should you brighten just the face?
5. Selective brightening of the face
Portrait photographers have done a version of this forever, lifting the subject a little relative to the surroundings. On a phone this can be a radial adjustment, a brush, or simply a mild vignette that darkens the corners. Two things to keep in mind. Keep it subtle enough that no one notices, and never brighten only the face while the light in the room clearly comes from one side, because it destroys the direction of the light you worked to get.
| Adjustment | Fixes | How far to push |
|---|---|---|
| Exposure | Too dark, too bright | Until skin reads correct, keep highlight texture |
| White balance | Orange, blue or green casts | Until a known-neutral object looks neutral |
| Crop & straighten | Clutter, tilt, weak composition | Tighter than feels natural |
| Contrast | Flat, lifeless files | Small. Stop before the shadows go black |
| Face brightening | Eye drifting to the background | Subtle enough to be invisible |
Color casts you cannot slide away
White balance corrects the whole frame at once, which works beautifully for a warm bulb and badly for a bright red blanket. Saturated fabric bounces its own color up onto the cheeks and chin, so the cast is local rather than global. Cool the whole image to fix a red face and the rest of the room turns blue.
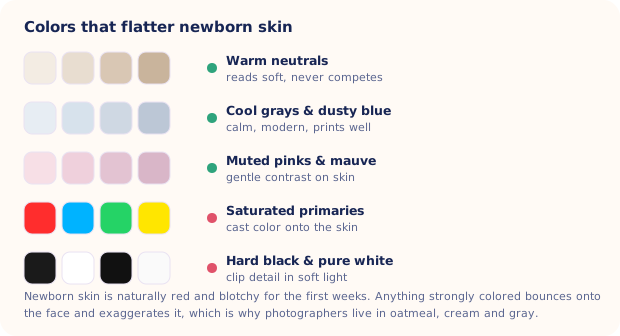
The swatch chart below shows why photographers keep reaching for oatmeal, cream, dusty blue and mauve. Those tones sit close to neutral, so they leave almost nothing for you to correct afterwards, while the saturated row underneath creates problems that begin at the shutter and follow you into the edit. Our post on choosing colors for baby photos goes deeper on the shooting side.
Why heavy skin smoothing looks wrong on a newborn
Every phone editor now ships some form of smoothing, and on a newborn it backfires almost immediately. New skin has texture that adults do not. Fine lanugo hair, dry flaking across the nose and shoulders, blotchy patches, a scattering of milia. Smooth all of that away and you get a small plastic doll where your baby used to be. The photo stops looking like a photo.
Restraint reads as skill. Reduce the redness of a spot if it bothers you, soften a scratch from a fingernail, leave everything else. In ten years, the peeling skin and the squashed newborn nose are precisely the details that will make you gasp.
Edit a newborn the way you would retouch a portrait of your grandmother. Correct the lighting, remove the temporary blemish, leave every single thing that makes the face theirs.
Keeping skin tones honest
Skin tone is the one area where "whatever looks nice" is a trap, because screens vary wildly and the eye adapts within seconds. Three habits that keep you anchored:
- Compare against reality. Look at your baby, then at the screen. It sounds obvious and almost nobody does it.
- Watch saturation. Global saturation boosts hit skin hardest. If cheeks are turning tomato, that slider is the culprit.
- Edit at a consistent brightness. A phone at 20% brightness makes you overcook everything. Set it around 70% and leave it there.
Getting this right at capture is easier than fixing it later, which comes back to light. One window, no overheads, no flash. The full setup lives in our newborn photography lighting post.
How do you do baby photo editing on a phone?
The built-in Photos editor covers all five adjustments, and for baby photos it is genuinely enough. Use Exposure and Brilliance carefully, Warmth and Tint for white balance, the crop tool with its auto-straighten, and a light touch on Contrast. Auto enhance is a reasonable starting point as long as you check what it did to skin color and dial it back (it nearly always adds too much warmth). More phone-specific technique sits in our iPhone newborn photos guide.
If you plan to print, edit the full-resolution original rather than a shared or messaged copy, and keep an unedited version. Tastes change; originals do not. Print specifics are covered in printing baby photos.
Where editing stops and regenerating begins
Sliders can only rebalance what the camera recorded. They cannot remove the laundry pile, replace the beige carpet, add a knit blanket, or invent the soft directional light of a studio that was never in the room. That boundary is where most parents get frustrated, pushing shadows and clarity around trying to make a snapshot into a portrait.
Different tool, different job. Totti regenerates the scene instead of correcting it, aiming to keep your baby recognizable while rebuilding the background, outfit, styling and lighting from one clear photo. Our baby photo editor guide walks through when to reach for adjustment sliders and when to hand the whole frame over.
If you use a conversational image editor, start with one bounded instruction rather than “make it perfect.” These 30 baby photo editing prompts separate corrections, cleanup and creative restyling while spelling out which identity details must stay unchanged.

When sliders run out of road
Upload one clear photo and Totti rebuilds the backdrop, outfit and lighting across 50+ templates, with a before and after slider so you can see exactly what changed. Export in HD at 2048×2560. Free to download on iPhone.
Get Totti on the App StoreLearn the five adjustments and you will never look at an unedited baby photo the same way again. Learn where they stop, and you will stop wasting evenings trying to slide your way out of a problem the camera never captured.