A good newborn photoshoot at home needs one soft window, a plain blanket on a firm floor-level surface, a phone with a clean lens and an adult who stays beside the baby. Set those four things before bringing baby into the space, then take a short list of frames by moving the camera instead of repositioning the baby.
The checklist below takes 15 minutes, and the ten-shot workflow can be completed from one simple back-lying setup. If baby fusses or will not settle, stop; a shorter session on another day is always the better photograph.
What do you need for a newborn photoshoot at home?
- A window with indirect light. North-facing or shaded is useful, but any window works when direct sun is not falling across the setup.
- A firm, floor-level surface. Put a thin, smooth blanket over a firm pad on the floor. Skip beds, couches, beanbags, baskets and elevated props.
- A calm, fed baby. Choose a settled period, keep the room comfortable rather than hot, and do not delay feeding or sleep to finish a shot list.
- Your phone. Clean the lens, turn off flash and switch off overhead room lights so the window is the single light source.
- An adult spotter. One adult stays within arm's reach and watches the baby for the entire setup, even at floor level.
Your 15-minute newborn photoshoot setup checklist
- Minutes 0–3: choose the light. Find a bright window without a sunbeam on the floor. Switch off ceiling lamps and clear cords, furniture edges and loose props from the shooting area.
- Minutes 3–6: build the floor setup. Place a firm pad parallel to the window, pull a neutral blanket smooth and leave enough room for the spotter to kneel beside it.
- Minutes 6–9: prepare the phone. Clean the lens, use the rear camera in regular Photo mode, turn flash off and check that storage and battery will last. The iPhone newborn camera-settings guide explains focus lock, exposure and burst shooting.
- Minutes 9–12: simplify the styling. Choose one plain onesie or a correctly fitted everyday sleep garment. Keep plaques, flowers and textiles outside baby's reach rather than arranging them around the face.
- Minutes 12–15: bring baby in last. With the spotter already in place, lay baby on their back with the head and neck neutral. Take one test frame, check that the face is evenly lit, then begin.
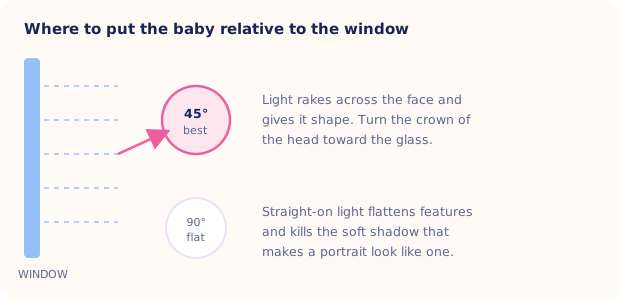
Room layout: put the crown of baby's head toward the window and let the light cross the face from the side. If you see a hard-edged shadow, move the setup farther from direct sun or use a sheer curtain.
Download the window-light diagram (SVG) · Read the lighting guide
A ten-shot workflow without moving the baby
Keep baby on their back and change your framing. This produces a varied set without cycling through physical poses:
- One scene-setter: the whole blanket and a little of the window-side room.
- One full-length portrait: head to toes, photographed from directly above while you stay securely kneeling—never stand on a chair over baby.
- One vertical face portrait: shoulders and face, with focus placed on the nearer eye.
- One horizontal face portrait: leave negative space beside the face for announcement wording.
- One camera-side angle: lower the phone toward blanket level; baby stays on their back.
- One hands detail: include both hands wherever they rest naturally.
- One feet detail: move the phone, not baby's legs.
- One scale detail: a parent finger beside baby's hand, without asking baby to grip.
- One clothing or blanket detail: texture gives an album page visual variety.
- One unscripted frame: a yawn, stretch or calm open-eyed look if it happens on its own.
This is an actively supervised photo setup, not a sleep space. When shooting ends, move a sleeping baby to the firm, flat, back-lying sleep setup recommended by the American Academy of Pediatrics. If you want a curled, upright or chin-on-hands look, check the newborn poses cheat sheet first; those polished poses are often professional composites.
A complete set does not require ten perfect pictures. One sharp face portrait, one full-length frame and one detail shot are enough for an announcement, print and album page.
Quick troubleshooting during a home newborn shoot
| What you see | Likely cause | Fast fix |
|---|---|---|
| Hard shadow across the face | Direct sun or baby too close to the glass | Move back from the window or close a sheer curtain |
| Yellow or mixed color | Window light mixed with ceiling lamps | Turn room lights off and use the window alone |
| Soft or blurry eyes | Low light, dirty lens or motion | Clean the lens, move nearer the window and use burst mode; see the iPhone settings guide |
| Blanket looks wrinkled | Loose backdrop | Smooth it before baby arrives; crop tighter instead of adjusting fabric near baby |
| Baby fusses or feels warm | The session has gone on too long or baby needs care | Stop immediately, pick baby up and meet the need; retry another day |
The shortcut: let AI do the studio part
AI styling happens after the shutter, so the source frame can stay simple. Totti takes a clear photo of your baby and regenerates the scene around it—backdrop, lighting, wardrobe and props—while aiming to keep the face recognizable. Compare every generated portrait with the original and discard any result that changes an important feature.
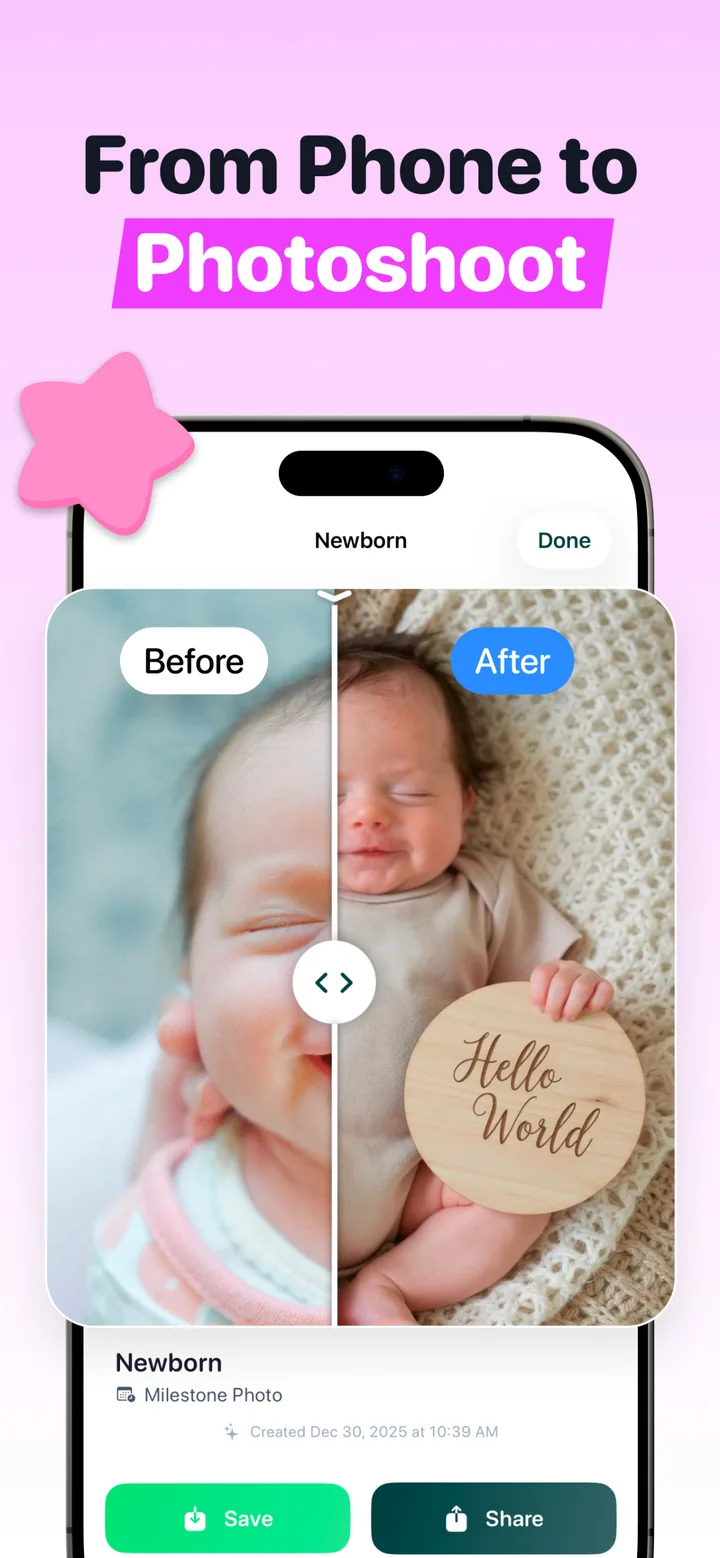
That blurry-background crib photo becomes a "Hello World" milestone portrait on a knit blanket. The over-exposed lap shot becomes a classic studio pose. Template choice runs from cozy blanket scenes to outdoor garden settings, classic studio portraits and seasonal themes. The app handles what a photographer, stylist and editor would normally do.

Do it with Totti, free
Upload one photo from your home shoot, choose from 50+ templates like Potato Sack Pose or Sweet Slumber, and export a studio-style portrait in HD (2048×2560). Free to download on iPhone.
Get Totti on the App StoreHow does a home photoshoot compare with a studio session?
Three routes to portraits from the same week of your baby's life, with very different price tags and very different demands on your morning.
| Option | Cost | Effort | Result |
|---|---|---|---|
| Studio session | $200–$800+ | Booking, travel, 2–4 hrs | Professional, 2–3 setups |
| DIY only | Free | Setup + luck + editing | Charming, hit-or-miss |
| DIY + Totti AI | Free to start | One good snapshot | Studio-style, 50+ setups |
The studio figures track 2026 US newborn pricing guides, where a quote lands mostly according to how many edited images come home with you. The two home routes cost nothing to attempt, which is why plenty of families try them first and book a studio only if the results leave them wanting more.
Tips for the photo you upload
- Face clearly visible and in focus. Better source detail gives the model more information to work from.
- Daylight over lamplight. Window light keeps skin tones true.
- Avoid extreme angles; straight-on or slightly above works best.
- One baby per photo for portrait templates.
Then compare the result with the built-in before/after slider, add a Polaroid or Wood frame, and export in HD for birth announcements, grandparents' fridges and nursery walls.