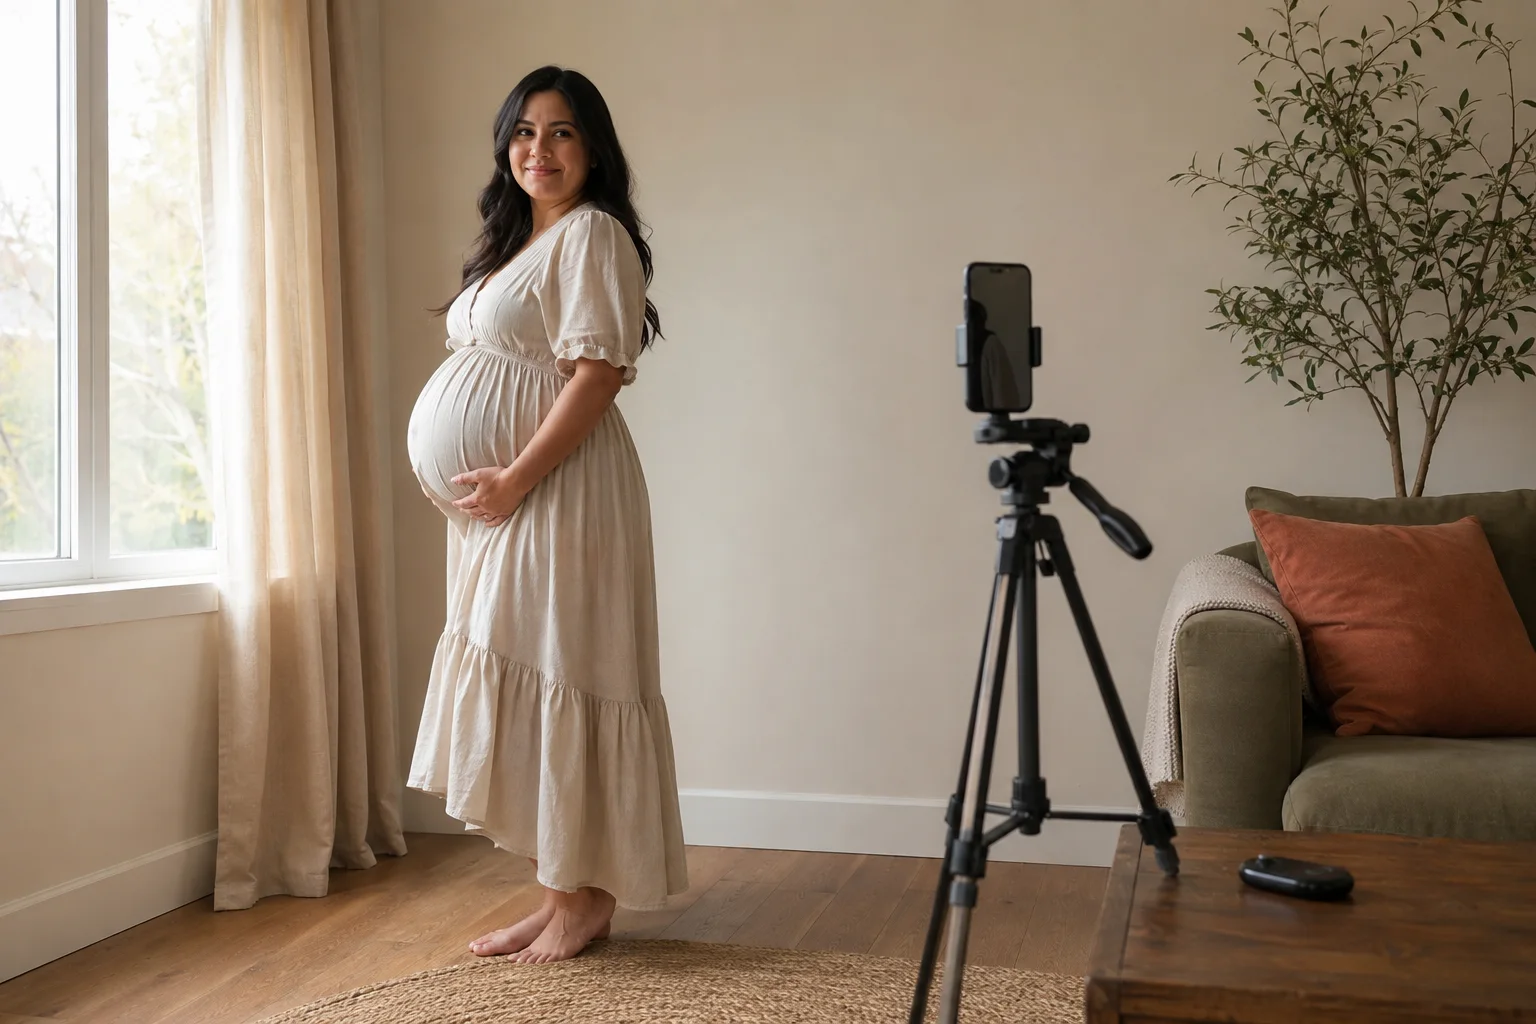
The easiest maternity photoshoot at home uses the brightest window in one comfortable room, a phone held around mid-torso height, and six simple frames rather than six elaborate sets. Stand or sit a step back from the window, turn off mixed-color room lights, and photograph the person—not just the bump. A real expression in a familiar place will age better than a complicated pose that feels uncomfortable.
This guide is for making maternity portraits during pregnancy. It does not replace the separate bump-to-baby photo plan, which explains how to repeat one composition after the baby arrives. There is no required week for these photos: choose a day when the pregnant person wants to be photographed and has the energy for a short session.
Choose your setup in one minute
Pick the row that matches the room and the amount of help available. The best plan is the one that can be stopped and restarted without moving furniture or changing outfits repeatedly.
| Look | Where to stand or sit | Who takes it | Best frame |
|---|---|---|---|
| Soft and simple | Side-on beside a window | Partner or friend | Vertical three-quarter portrait |
| Documentary | Nursery chair or sofa edge | Partner or phone timer | Wide room story |
| Graphic silhouette | Between camera and bright curtain | Tripod and timer | Side profile |
| Close and personal | A pace away from a plain wall | Partner or friend | Hands, face and bump detail |
| Family chapter | Seated together near the window | Stable phone support and timer | Everyone looking at one another |
Build a one-window photo corner
Start with the room, not the pose. Open the curtains and watch where the window makes faces look bright without a hard stripe of sunlight. Stand slightly behind that patch so the light reaches the face and front of the body from the side. If direct sun creates sharp shadows, use a sheer curtain or move farther from the glass. Do not hang fabric over a hot lamp or balance a reflector where it can fall.
Turn off ceiling lights and nearby lamps; daylight mixed with warm bulbs can make skin look orange on one side and blue on the other. Clear only what the camera sees. A laundry basket outside the frame is more useful than cleaning the entire room. Keep one meaningful object—a book, ultrasound envelope, small pair of shoes or nursery textile—if it genuinely belongs to the story.
Wipe the phone lens, use the rear camera when someone else is shooting, and leave enough distance to avoid the stretched look of an ultra-wide lens. On an iPhone, the regular 1× camera is a dependable start. Tap the face to focus, then lower exposure slightly if the window is washing out skin. Portrait mode can soften a busy room, but take a normal-camera version too in case the simulated blur cuts into hair, hands or clothing.
12 comfortable maternity photo ideas
- Window-side profile. Turn the body about 90 degrees to the camera, then turn the face gently back toward the light. Let the hands rest naturally instead of pressing the bump into a shape.
- Seated nursery portrait. Sit fully supported in a familiar chair with feet grounded. Include enough of the room to show where the family was preparing for the baby.
- Face-first portrait. Frame from the waist up and focus on the expression. The pregnancy is part of the image, but the person remains the subject.
- Hands and texture. Photograph hands resting on clothing, a knit cardigan, a necklace or another detail that will feel specific later.
- Mirror frame. Use a clean mirror to include both the subject and a slice of the room. Check the edges for private notes, addresses and clutter before shooting.
- Quiet reading scene. Sit by the window with a favorite book or baby journal. Look down, turn a page, then look toward the camera for three distinct frames.
- Doorway composition. Stand on level flooring inside an open doorway while the photographer steps back. The doorway creates a natural frame without adding props.
- Partner embrace. Stand or sit side by side and look at each other rather than the lens. Take a wide frame, a close frame and one of joined hands.
- Older-child conversation. Let a child talk, read or show a drawing to the pregnant parent. Keep expectations brief and accept the expression they give.
- Pet nearby, not directed. If a calm pet normally sits beside the family, let another adult manage it. Do not balance treats near the body or force contact for the photo.
- Simple silhouette. Face sideways in front of a bright sheer curtain and tap the brightest part of the screen so the figure darkens. Make a normal, face-visible portrait as well.
- Last frame, no instructions. Ask the subject to settle into the most comfortable position and talk with the photographer. The release after the posed frames often produces the favorite.
None of these ideas needs climbing, lying on a hard floor, leaning far backward or balancing on a narrow chair. Skip any direction that strains the back, changes breathing, causes dizziness or simply feels wrong. A portrait is optional; comfort is not.
Use camera height to change the portrait
Keep the phone roughly between chest and waist height for most standing frames. A camera held too low can make the nearest part of the body appear disproportionately large, while a phone held high may minimize the bump and shorten the figure. Step backward before switching to an ultra-wide lens. Distance produces a more natural perspective and leaves room to straighten the crop.
For a side profile, ask the photographer to keep the phone parallel to the floor. For a seated portrait, lower the camera to the subject's upper-body height instead of shooting down from standing height. Make small changes—straight on, 45 degrees, side-on—while the subject stays comfortable. Moving the photographer is easier than repeatedly moving the pregnant person.
How to take maternity photos by yourself
Use a proper phone tripod or a stable purpose-built holder on the floor. Do not wedge the phone on stacked books near an edge or climb onto furniture to reach it. Compose a wider frame than you think you need, switch on the timer, and place a small object on the floor where you want to stand. That marker prevents every take from having a different focus distance.
Take short bursts of three or four timer frames with one change between them: eyes to camera, eyes toward the window, hand position, then a small turn. A Bluetooth remote is convenient if you already have one, but keep it visible in a hand or hide it behind the body rather than twisting awkwardly. Record one brief video too; a still frame can preserve a natural laugh, though it may have less resolution than a dedicated photograph.
What should you wear for an at-home maternity shoot?
Choose clothing that feels like the person on an ordinary good day. Solid mid-tone colors, small textures and simple necklines keep attention on the face. Cream against a cream wall can disappear, while a black outfit against a bright window can lose detail; add a little separation between clothing and background. Our guide to colors in baby and family photos explains how warm neutrals, cool grays and muted colors affect skin and the room.
Prepare one primary outfit and one quick layer, such as an open cardigan or overshirt, rather than a full wardrobe change. Check comfort while sitting as well as standing. Remove tight accessories if they leave distracting marks, but do not tell someone to hide swelling, stretch marks, mobility aids or anything else that is part of their body. Retouch temporary lint if desired; do not edit the person into a different shape.
The six-frame maternity shot plan
- Frame 1: a wide horizontal image that shows the home and this stage of life.
- Frame 2: a vertical portrait with face, hands and bump all clearly visible.
- Frame 3: a side profile in soft window light.
- Frame 4: a close detail of hands, clothing texture or a meaningful object.
- Frame 5: a partner, child or pet interaction that actually happens rather than a staged gaze.
- Frame 6: a simple composition that can be repeated after birth for a bump-to-baby pair.
Make the repeatable frame especially plain: mark the photographer's position, note whether the phone used 1× or 2×, and save a screenshot showing the crop. The bump-to-baby guide explains how matching light, room and camera height matters more than wearing identical clothes months later.
Edit gently and share deliberately
Choose the strongest six before editing. Straighten vertical lines, crop distractions, adjust brightness and correct an obvious color cast. Avoid aggressive skin smoothing, body reshaping and presets that turn skin orange or gray. The site's five-step photo editing guide covers exposure, white balance, contrast, saturation and cropping without making a portrait look synthetic.
Before sharing, check mirrors, mail, calendars, ultrasound labels and windows for private information. Ask every identifiable person whether they approve the exact image and audience. A private family album and a public post do not need to contain the same frames. Use the baby-photo privacy checklist for location clues and audience settings that will also matter after birth.
Where Totti fits later
Totti does not create prenatal maternity portraits and should not be used to invent an ultrasound or pregnancy image. It starts with a real, individual baby photo after birth and restyles that source into a studio-style portrait. If you save one clean maternity composition now, you can photograph the baby or a parent-held newborn in the same room later, then use Totti separately for an individual styled baby portrait.
The app is free to download for iPhone, requires iOS 17.0 or later, and offers more than 50 photoshoot templates with HD export at 2048×2560. AI can change details, so compare every generated portrait with the source before saving, printing or sharing it.

Continue the photo story after birth
Save a repeatable maternity frame now. Once your baby arrives, Totti can restyle one clear baby snapshot into an individual studio-style portrait. Free to download for iPhone; optional in-app purchases.
Get Totti on the App Store