The best time of day for baby photos is when two things overlap: your room has bright, indirect window light and your baby is already comfortable. Mid-morning is a useful starting point in many homes, but window direction, season, weather and the baby's ordinary routine matter more than the clock.
Check the room first. If the face is evenly lit without a direct sunbeam, and the baby does not need feeding, changing, sleep or other care, you have a workable window.
How does window light shift through the day?
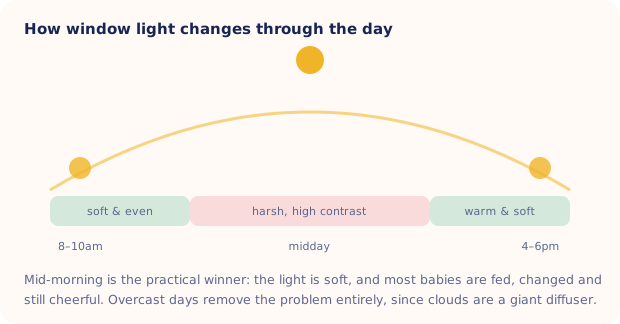
When the sun sits low, its light travels through far more atmosphere before it reaches you, which scatters and softens it. When the sun is high overhead, that light arrives concentrated and hard, punching bright rectangles across your floor and dropping shadows straight down into eye sockets. Same window, same room, completely different photograph four hours apart.
| Time | What the window gives you | Verdict for babies |
|---|---|---|
| 7–9am | Soft, dim, warm cast | Pretty, but often too dark for a moving baby |
| 9–11am | Often bright and even, depending on window direction | A useful starting point |
| 11am–3pm | Strong, direct beams, hard shadows | Needs a sheer curtain or open shade |
| 3–5pm | Warm, directional, softening again | Useful if it fits the baby's routine |
| After sunset | Lamps and ceiling bulbs only | Expect orange skin and blur |
Position matters just as much as hour. Set the baby roughly 45 degrees to the glass, turn the flash off, and kill every overhead bulb. Our guide to newborn photography lighting walks through the setup step by step. Timing is the other half of the same problem.
Why is mid-morning a useful starting point?
In many rooms, mid-morning provides more light than early morning without the hard direct beam that may arrive near midday. It is not a rule, and no feeding or sleep schedule should be changed for a photograph.
- Assess light, not just time. A north-facing window, an east-facing window and an overcast day all behave differently.
- Follow the baby's routine. Wait until ordinary care is complete, but never advance or delay a feed, change or nap for the camera.
- Use normal clothing and room conditions. Do not undress, wrap or heat a baby to produce a particular look.
- Keep the position ordinary. Use a back-lying view on an appropriate firm, flat setup or an alert adult's normal supported hold; do not try to create curled or chin-to-chest poses.
The diagram below plots the sun's arc across the day, with the soft bands at either end and the harsh stretch in the middle.
Overcast days are free diffusion
A thick cloud layer turns the whole sky into one enormous diffuser. The direct beam disappears, so the harsh middle of the table above simply stops existing. On a properly gray day your window stays usable from about 9am until late afternoon, which takes most of the pressure off your scheduling.
The trade-off is quantity. Less total light means a slower shutter, which means blur if your baby kicks. Two fixes: move the blanket closer to the glass, and brace your elbows against your body or a cushion. Phone shooters get more specific help in our iPhone newborn photo guide.
Gray skies are the one forecast newborn photographers actually hope for. Clouds stretch the good window from ninety minutes to most of the day, and nothing you can buy replicates that evenly.
Working around the nap schedule
Newborns, 0 to 3 months
Let care set the timing. If the baby is asleep, photograph them on their back in their normal empty, firm, flat sleep space, consistent with American Academy of Pediatrics safe-sleep guidance. If the baby is awake, use an appropriate firm floor-level setup with active supervision or an ordinary supported hold. Keep the session short and stop whenever the baby needs attention. Our post on when to take newborn photos explains why days 5–14 are a studio convention, not a deadline.
Three to eight months
Choose an ordinary awake period when your baby is comfortable and use only positions they can already hold without being propped. A second adult can focus on the baby while you photograph. The ideas in how to make a baby smile keep the interaction gentle and optional.
Crawlers, toddlers and first birthdays
Choose a familiar awake period and a contained, hazard-free space. The clock matters less than avoiding a time when the child needs food, sleep or quiet. There are more low-pressure ideas in our first birthday photoshoot post.
When midday is the only free slot you have
Plenty of parents do not get to choose. If the one calm hour lands at noon, five moves still rescue the frame.
- Use an installed sheer curtain. It can soften a hard beam. Do not tape or hang loose fabric where it can fall into the photo area.
- Step back from the glass. Light falls off fast. Six feet into the room is gentler than right against the window.
- Use the shade side of the house. Any room the sun is not currently hitting gives you indirect light, even at noon.
- Turn the face away from the beam. If a stripe of sun crosses the blanket, rotate the whole setup rather than trying to edit the stripe out later.
- Go outside into open shade. A covered porch, the north side of a building, or the shadow of a large wall all work. Skip dappled shade under leaves, which scatters bright blotches across the face.
What if the good hour never arrives?
Some weeks it simply does not happen. The nap lands at 7pm, your only free wall faces a dim hallway, and the sharpest photo you managed is flat and a little yellow. That used to be the end of the story.
It no longer has to be. Totti takes one clear photo and generates a new background, styling and light with a studio-style look. The goal is a recognizable result, but AI can change details, so compare it with the source. Your starting point is still a sharp frame with a visible face, which is the shortcut behind DIY newborn photography at home.

Shot at the wrong hour? Fix it after the fact
Upload one clear photo, choose from 50+ templates including Sweet Slumber and Curled Taco Pose, and Totti rebuilds the backdrop and lighting. Export in HD at 2048×2560. Free to download on iPhone.
Get Totti on the App StoreAim for mid-morning when your week allows it. Take the gray days gratefully. And on the afternoons when the light is wrong and the baby is done, shoot anyway, because a slightly flat photo of this exact week beats a perfect photo you never took.