Most props make a photo more complicated. They pull attention off the face, add clutter and can introduce containers, loose materials, small parts or raised surfaces that do not belong in a DIY newborn setup. The lowest-complexity approach to newborn photography props is to keep styling outside the baby's space and leave the baby in an ordinary, appropriate position.
This post covers the styling items that can remain outside reach, the setups to skip at home and what to do instead. It is not a substitute for individualized advice from a pediatric clinician or for the training of a specialist newborn photographer.
Which styling items can stay outside baby's reach?
1. Ordinary fitted clothing
Use what the baby is already wearing if it is comfortable and appropriate for the room. Do not learn wrapping or swaddling from a photography article, and do not add a wrap solely to produce a curled look. If your family routinely swaddles, follow current guidance from your pediatric clinician and the product manufacturer rather than photo instructions.
2. A plain visual background
A blank wall, neutral rug outside the baby's reach or simple digital crop can provide visual texture without loose fabric around the baby. Do not use chunky knit, folded blankets or other padding as a posing surface.
What should stay outside the baby's space?
3. Empty baskets and containers
Keep baskets, crates and buckets empty and outside the baby's area, or add them digitally after the photo. Do not place a newborn inside a container at home, even when the container is on the floor or an adult is close by.
4. A wooden name or milestone plaque
Milestone plaques can give a photo context, but they should remain outside the baby's reach and outside any sleep space. The simplest alternative is to photograph the plaque separately and combine the two images in a card layout, as described in our baby milestone photos guide.
Which props should you never attempt at home?
These setups appear in newborn galleries, but they should not be copied at home. A finished photograph does not show the specialist training, support or compositing that may have been involved.
- Raised buckets, crates and stools. Keep the baby off raised props. An adult standing nearby does not make the setup appropriate for a DIY session.
- Hammocks and suspended wraps. Never suspend a baby for a photo. Finished gallery images may be composites and are not instructions for recreating the physical setup.
- Fairy lights and candles. Heat, cords, glass, and something that can be pulled. The photo is worth nothing next to any of those risks.
- Small decorative extras. Keep loose beads, wooden letters, dried flowers, tiny bows and wired decorations outside the baby's reach.
- Anything placed in the baby's hand. Do not ask a newborn to hold a prop or place an object in their fist for the photo.
What makes a newborn prop unsafe?
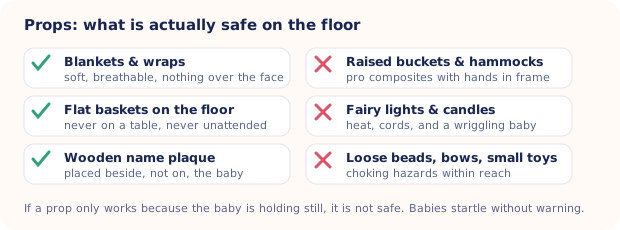
The practical split is simple: an at-home styling choice should not require placing, wrapping, propping or containing the baby. Keep decorations outside reach and move the camera or crop instead of moving the baby.
If a concept depends on a basket, loose fabric, a raised surface, a specialized hold or supporting hands that will later be edited out, leave it to a trained newborn photographer or create the styling digitally from a simple source photo.
A spotter does not make a risky prop appropriate
Have an alert second adult beside the baby and focused only on supervision while you photograph. That adult should not also hold equipment, style props or manage another child.
Even with a second adult present, avoid raised surfaces, adult beds, couches, beanbags, containers and specialized poses. Use normal, comfortable room conditions and end the session when the baby needs care or seems unsettled. Our full newborn photography safety post explains the conservative home-photo baseline.
If a concept only works while the baby stays in a particular position, skip the physical setup. Move the camera, use separate frames or add the styling digitally.
At-home styling check by item
Use this table to decide what stays in the scene and what should remain outside the baby's space.
| Item | Lower-complexity use | Leave out |
|---|---|---|
| Clothing | Baby's normal fitted outfit | Photo-only wrapping or costume changes |
| Background | Plain surface outside reach or digital crop | Loose, padded or open-weave material around baby |
| Basket or crate | Empty and outside the baby's area | Baby placed inside, even at floor level |
| Wooden plaque | Photographed separately or well outside reach | In a sleep space, on the body or in the hand |
| Headband or small accessory | Add digitally if desired | Placed on or beside a newborn for the photo |
Prop-free alternatives that look better anyway
Strip the props out and newborn photos often improve. Four ideas that need no specialty posing gear:
- Ordinary parent-held portrait. One adult supports the baby as usual while a second adult photographs.
- Hands. A whole newborn hand curled around one adult finger, filling the frame. No context needed.
- Feet and profile. Toes, the curve of an ear, the back of a neck. These are the details that fade from memory first.
- Back-lying or detail view. Use the baby's normal fitted clothing and an appropriate firm, flat setup; our guide to a newborn photoshoot at home explains the conservative workflow.
Choosing the surface underneath matters more than choosing objects to put on it. Our post on baby photo backdrop ideas covers the fabric and wall side of the same problem.
Can you add props after the photo is taken?
Some of the props parents want most are the ones that make the least sense to buy. A seasonal set gets used once. A wooden plaque for every month means twelve plaques. Styled outfits get outgrown before the photo is printed.
That styling can be explored after the shot instead. Totti takes one clear source photo and generates a new scene that may include virtual outfits, milestone plaques and styled templates. Keep the source setup simple and conservative. AI can alter facial details, hands, clothing or proportions, so compare the output with the source and discard anything inaccurate.

Explore styled props without a physical prop setup
Wraps, knits, wooden plaques and seasonal styling across 50+ templates, applied to a photo you already took. Results vary and should be checked against the source. Export in HD at 2048×2560, free to download on iPhone.
Get Totti on the App StoreThe short recommendation
Do not buy a posing prop for an at-home newborn session. Use ordinary fitted clothing, a plain background outside reach and a simple back-lying, detail or parent-held source photo. The photo is never worth adding a container, raised surface or specialized pose.
Seasonal sets, styled outfits and milestone labels can be added to the layout later. That keeps the physical session short and avoids asking the baby to interact with photo gear.